MEASUREMENT
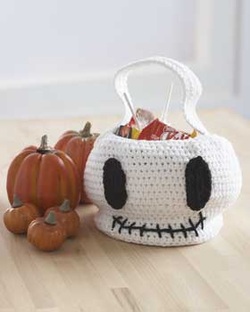
Approx 6 ins [15 cm] in diameter x 6 ins [15 cm] high, excluding handle.
MATERIALS
Lily® Sugar’n Cream
(70 g/2.5 oz; 109 m/120 yds)
Main Color (MC) (00001) White 1 ball
Contrast A (00002) Black 1 ball
Size 5 mm (U.S. H or 8) crochet hook or size needed to obtain gauge.
Piece of lightweight cardboard for bottom of Bag.
GAUGE
13 sc and 14 rows = 4 ins [10 cm].
ABBREVIATIONS
www.sugarncream.com/glossary
INSTRUCTIONS
Note: Ch 2 at beg of each rnd counts as hdc.
BAG
With MC, ch 4. Join with sl st to form ring.
1st rnd : Ch 2. 11 hdc in ring. Join with sl st to top of ch 2. 12 hdc.
2nd rnd : Ch 2. 1 hdc in same sp as sl st. 2 hdc in each hdc around. Join with sl st to top of ch 2. 24 hdc.
3rd rnd : Ch 2. 1 hdc in same sp as sl st. 1 hdc in next hdc. *2 hdc in next hdc. 1 hdc in next hdc. Rep from * to end of rnd. Join with sl st to top of ch 2. 36 hdc.
4th rnd : Ch 2. 1 hdc in each hdc around. Join with sl st to top of ch 2.
5th rnd : Ch 2. 1 hdc in same sp as sl st. 1 hdc in each of next 2 hdc. *2 hdc in next hdc. 1 hdc in each of next 2 hdc. Join with sl st to top of ch 2. 48 hdc.
6th rnd : As 4th rnd.
7th rnd : Ch 2. 1 hdc in each of next 2 hdc. *2 hdc in next hdc. 1 hdc in each of next 3 hdc. Rep from * to last hdc. 2 hdc in last hdc. Join with sl st to top of ch 2. 60 hdc.
8th rnd : Ch 2. Working in back loop only of each hdc, 1 hdc in each hdc around. Join with sl st to top of ch 2.
9th to 13th rnds : Ch 2. 1 hdc in each hdc around. Join with sl st to top of ch 2.
14th rnd : Ch 2. 1 hdc in same sp as sl st. 1 hdc in each of next 4 hdc. *2 hdc in next hdc. 1 hdc in each of next 4 hdc. Rep from * to end of rnd. Join with sl st to top of ch 2. 72 hdc.
15th rnd : Ch 2. 1 hdc in same sp as sl st. 1 hdc in each of next 5 hdc. *2 hdc in next hdc. 1 hdc in each of next 5 hdc. Join with sl st to top of ch 2. 84 hdc.
16th to 22nd rnds : Ch 2. 1 hdc in each hdc around. Join with sl st to top of ch 2.
23rd rnd : Ch 2. 1 hdc in each of next 4 hdc. *Yoh and draw up a loop in each of next 2 hdc. Yoh and draw through all loops on hook – hdc2tog made. 1 hdc in each of next 5 hdc. Rep from * to last 2 hdc. Hdc2tog over last 2 hdc. Join with sl st to top of ch 2. 72 sts.
24th rnd : Ch 2. 1 hdc in each of next 3 hdc. *Hdc2tog over next 2 sts. 1 hdc in each of next 4 hdc. Rep from * to last 2 sts. Hdc2tog over last 2 sts. Join with sl st to top of ch 2. 60 sts.
25th rnd : Ch 2. 1 hdc in each of next 2 hdc. *Hdc2tog over next 2 sts. 1 hdc in each of next 3 hdc. Rep from * to last 2 sts. Hdc2tog over last 2 sts. Join with sl st to top of ch 2. 48 sts. Fasten off.
Eyes (make 2)
With A, ch 8.
1st rnd : 2 sc in 2nd ch from hook. 1 sc in each of next 5 ch. 3 sc in last ch. Do not turn. Working in rem loops of foundation ch, 1 sc in each ch to last ch. 1 sc in last ch. Join with sl st to first sc. 17 sc.
2nd rnd : Ch 1. 3 sc in first sc. 1 sc in each of next 7 sc. 3 sc in next sc. 1 sc in each of next 8 sc. Join with sl st to first sc. Fasten off.
Handle
With MC, ch 45.
1st row : 1 sc in 2nd ch from hook. 1 sc in each ch to end of ch. Turn. 44 sc.
2nd row : Ch 1. 1 sc in each sc to end of row. Turn.
Rep last row 4 times more. Fasten off.
FINISHING
Sew Eyes to Bag. With A, embroider mouth and teeth as shown in picture.
Attach Handle to either side of Bag. Cut circle of cardboard to fit in bottom of Bag.

 RSS Feed